R1100 Master Cylinder Reconditioning
Early R1100 front master cylinders were not anodized, and prone to internal wear and leakage. Master cylinders from lot numbers preceding 368 were replaced under warrant. Unfortunately the later ones are prone to wear and leakage also.
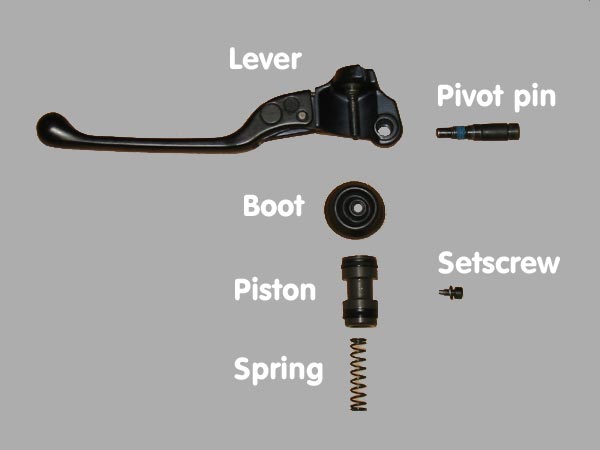
The piston has two seals: a liquid seal near the outside of the cylinder (near the lever) and a pressure seal at the inside. In nearly all cases the liquid seal starts to leak and you will see brake fluid dripping from the rubber boot behind the hand lever. Upon removal you will see corrosion and crystallized brake fluid around the outer edge of the cylinder bore, and the liquid seal will have visible wear at the edge of the lip.
Fortunately, some light reconditioning could spare you the cost of a new $300+ unit. BMW sells a rebuild kit and you can smooth the inner surface with fine emery cloth. This procedure steps you through stripping down and cleaning the MC. It's very straightforward; the housing stays in place on the handlebar and very little needs to be removed.
32 72 2 352 190 -cylinder & piston
32 72 2 332 037 - rebuild kit
You'll also want:
32 72 2 310 756 - boot (not included in rebuild kit)
07 11 9 963 072 (2) - crush washers for banjo bolt
Replacing the master cylinder is always an option and is basically guaranteed to be successful. However, on these models the grip has to be removed which means a lot of work especially on an R1100RT with heated grips, since the connection is inside the front fairing.
Step 1. Preparation.Tie the handlebars to full left lock and place damp cloths over ALL body parts under the master cylinder. Tying the bars keeps you from jostling them and spilling fluid at the wrong time (as if there's a right time). |
|
Step 2: Remove fluid and disconnect the brake hose.Remove the lid from the reservoir and siphon out as much as you can, then remove the banjo bolt from the brake line (with a rag wrapped around the area) and slowly pump the lever to expel the rest of the fluid. It will continue to drip, so leave the rag wrapped around the end of the hose when you're done. |
|
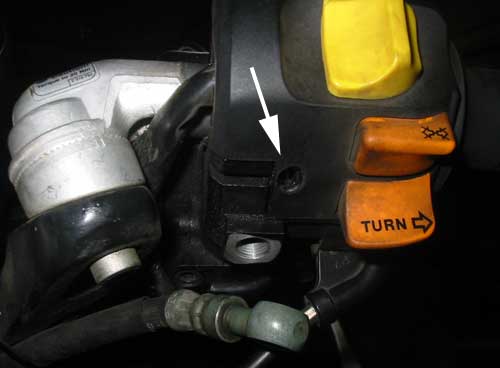
Step 3: Remove the switches.Remove the small screw under the switch assembly and push the switches upwards to unhook the top restraint. |
 |
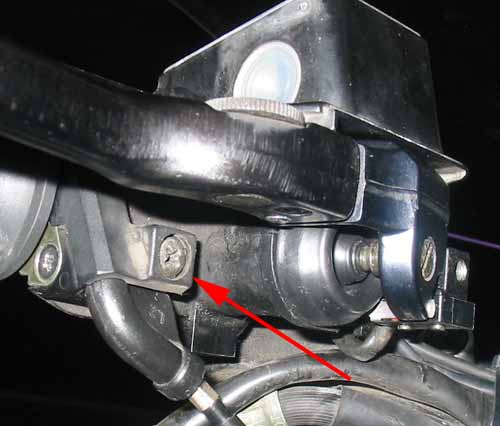
Step 4: Remove the throttle cable(optional, to allow more freedom to rotate the housing). Remove the phillips-head screw at the front, and pull away the cable retainer. Unhook the cable from the twistgrip. |
 |
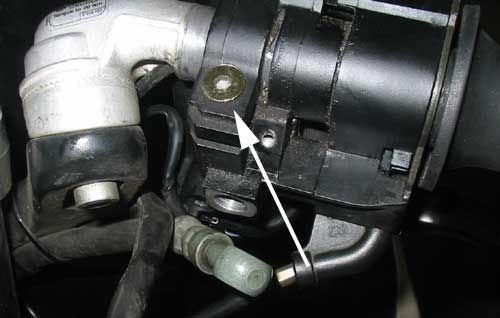
Step 5: Angle the housing upwards.To ease access to the cylinder bore, loosen the hex screw on the rear face of the housing and rock the housing backwards. |
 |
Step 6: Remove the lever.With a 5mm allen, remove the pivot bolt under the lever. After you have unscrewed it all the way you might need to pull down on it to remove it. Once the bolt is removed the lever can be pulled away. If you are going to replace the piston, remove the plunger from the lever now. You may have to warm the lever with a heat gun to loosen the threadlock. Clean the threads on each part. You need to remove this because the position of the new piston needs to be reset. |
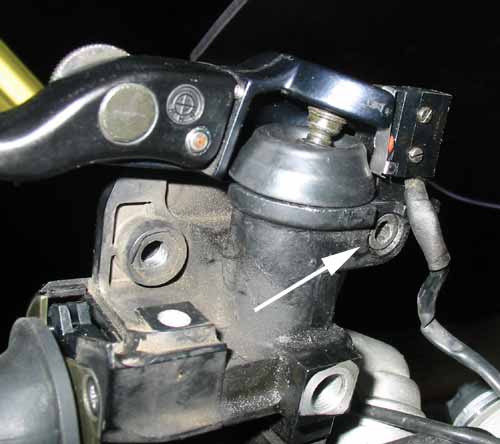 |
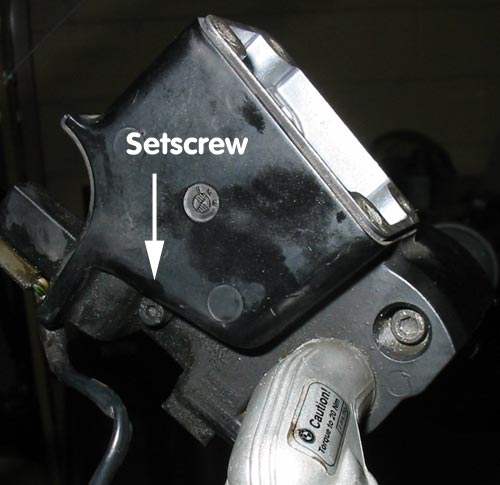
Step 7: Remove the piston.While restraining the piston, remove the 3mm allen setscrew from the left side of the housing. With the screw removed, the spring will push the piston out of the bore. If it doesn't, you may need to use compressed air or else push the piston inwards and scrape corrosion from the edge of the bore. |
 |
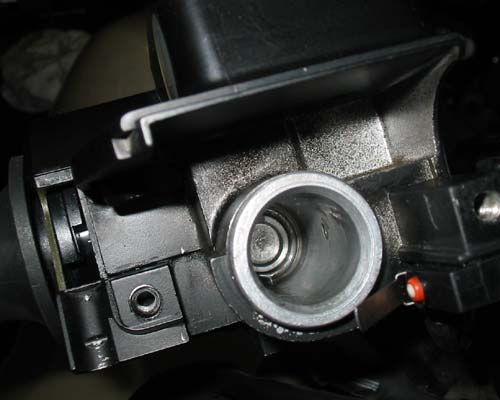
Step 8: Clean cylinder and piston.Inspect the inside of the bore for scuffs, and if you find them use very fine sandpaper (500 or higher) to smooth the inside surface. Clean the bore thoroughly; flush with solvent and blow with compressed air if possible. Be sure to lubricate the seals with brake fluid before reinstalling! You might think it will wet itself, but it won't and the return action will be very sluggish. Note: Do not use any grease other than brake-specific grease to lubricate the piston! Petroleum-based greases will damage the rubber. |
 |
Step 9: Reassemble in reverse order.Insert piston (with seal lips facing inwards) and replace the setscrew. Position the lever, taking care to not bend the brake switch, and install the pivot pin. If you removed the plunger pin from the lever, reinstall it with red Loctite. Thread it in until there is no lever free play and go an additional half turn. Replace the throttle cable and retainer. Reposition the housing to the correct angle on the handlebar. Install the brake hose (make sure the cable for the switch assembly is on the correct side) and install the switch assembly. |
|
Step 10: Purge brake fluid.By gently spreading the brake pads, you can push fluid back up into the master cylinder and reduce the amount of brake bleeding to be done. Bleed the brakes thoroughly, install the reservoir lid and you're done. |
|

