Bing CV Carburettors
Yesterday morning I rode downtown on the R75/5. It was a pretty chilly morning - right around freezing - but the bike started up immediately as usual. "No way," said a friend at work, "those old Airheads just don't like to start well in this weather." His bike is typical of so many Airheads out there. You hear them in the mornings at rallies, cranking and cranking. Just when the battery is running down they start to catch on one cylinder, thump like that for a few moments and with careful massaging of the throttle both cylinders come to life.
My starting routine consists of three crucial steps.
- I open the fuel petcocks
- I turn the choke.
- I push the starter button.
The engine starts immediately and as it starts to speed up I reduce the choke*, or I ride off and turn it off after a half mile.
Actually there was really a Step Zero that is more important than these: I cleaned the carbs. And when I say "cleaned" I don't mean that I sprayed some GumOut into the carb intakes; I really cleaned them. I used my Really Nasty Cleaning Stuff and made sure that every trace of fuel residue or corrosion was gone and that the carbs were truly in new condition. Clean carbs won't solve all problems worldwide, but they go a long way towards making the bikes run well.
Carb body
The CV carb body has passageways that run through it for air and fuel; obviously each of these must be clear. Most of them are fairly large and won't clog; the idle circuit (running from the idle jet to a small hole just in front of the butterfly) is an exception. To clean the carb body you need to remove the floats, all of the jets, the choke housing and the slide. Make sure that each passageway is clear, and that the seat for the float needle is clean.
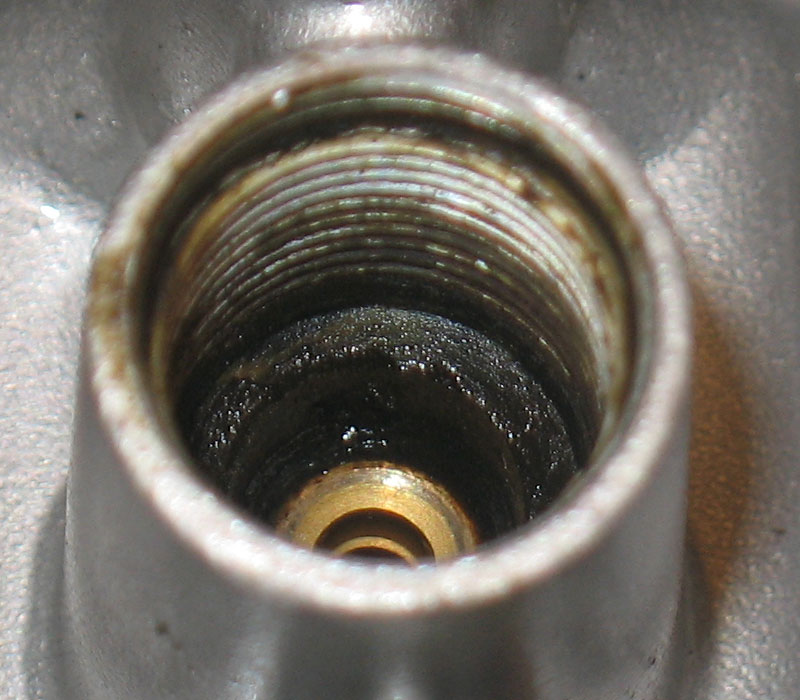
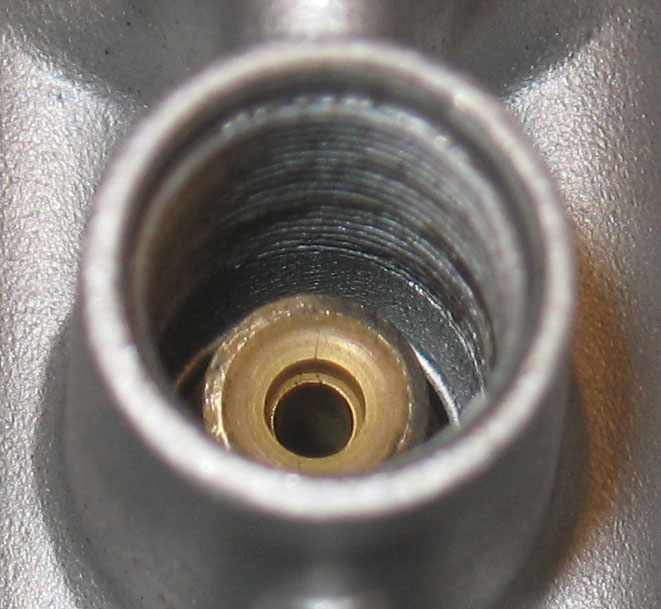
Here are some before & after shots of the atomizing chamber (click for a close-up):
Depending on the chemicals available, jets can be cleaned and reused. If you really want to eliminate them as a potential problem, they are not that expensive to replace. The main jets are about $5 and rarely clog, the idle jets are about $14 each and do clog. The needle and needle jet should be replaced every 25~50k miles anyway, because they do wear.
O-rings
There are five O-rings in the carburettor, two of them the same. Faced with the O-rings in your rebuild kit, this should help you figure out which goes where (don't assume you can simply buy O-rings in these dimensions at the hardware store and have them fit properly, though). Once you take away the large O-ring and the two identical ones, the thicker one remaining goes on the throttle shaft and the thinner one goes in the choke.
| Location | Approx. size | Relative size | BMW part number |
|---|---|---|---|
| cold-start enrichener shaft | 5x1.5mm | thin | 13 11 1 257 819 |
| main jet holder | 8x1.75mm | large | 13 11 1 257 812 |
| idle air screw idle jet |
3x1.75mm | small | 13 11 1 254 735 |
| throttle shaft | 6x2mm | thick | 13 11 1 254 739 |
Note: the very first CV carbs (3 and 4) had "large" O-rings on the cold-start as well as on the throttle, and no O-ring on the jet holder.
The three on the bottom of the carb (air screw, idle jet, jet holder) will probably be damaged when you remove them, so have new ones on hand. Install them with a light coating of silicon grease so they slide into position undamaged. They still might shred themselves when they are next removed, but they will be in place and working until then.
The choke is very important. Disassemble the choke assembly so you have the aluminum disc by itself and you will see a series of four small holes in an arc, with decreasing diameters. On bikes with a two-position detent on the cold-start lever only two of the holes are drilled through, but on older bikes three are. Each of these holes must be clear; they give you the increasing fuel enrichment as the disc is turned. When reassembling, make sure the gasket is flat and that the metal surfaces are clean and dry. It is almost certain that you will have to replace these gaskets because the old ones have sucked inwards.
Throttle shaft, plate & O-ring
Unless you know that there is a problem with the throttle shaft O-ring, you might skip replacing it. The exposed threads on the screws that hold the throttle plate in the shaft need to be ground away because they are peened over (to keep them from falling out) so the new ones need to be peened accordingly. Bing recommends do this, and includes the screws in their repair kits, but very few mechanics do because it can just cause more problems than it solves. If the throttle shaft turns smoothly with some friction, the O-ring is probably OK. If the shaft is truly loose, you need to replace the O-ring.
If you do replace the throttle shaft O-ring, pay close attention to the orientation of the throttle plate. Some carbs have a dot on the plate which should go 'up and out' but not all do so you might want to mark the plate before you remove it. Look at the edge; you will see that it is beveled. This bevel must match the wall of the throttle bore when the plate is installed.
Usually I slide the plate into the shaft, then gently snap it closed a few times (with the throttle stop screw backed out) and see if it centers itself. I usually have to move it around a bit by hand. Once there is almost no light shining around the edges of the plates, I leave the throttle closed and install the screws. I then open the throttle and squeeze the exposed threads with pliers to distort them.
Reassembly
Make sure the floats are set exactly to spec (parallel to the base of the carb body just as the float tang touches the tip of the float needle). I hold the carb body at an angle and rotate it to verify this. Gently bend the tang on the float if needed.
Install the air screws fully, and back them out by the amount specified in your manual (typically 3/4 turn). You'll need to check that adjustment once the engine is hot. When you assemble the slide, make sure the alignment tabs in the diaphragm are engaged in the slots in the carb body and the slide. The arch in the slide should be aligned with the throat of the carb when you are finished. The Bing manual lists the correct needle position for each bike; if in doubt put the needles where they were when you disassembled them.
To sum it up, all I do is make sure that every part of the carb is clean, undamaged, and set to the original configuration. These carbs worked very well when the bike was new so it's not surprising that they should work that well after you return them to new condition. The two hardest parts for most people will be dealing with the strong chemicals required and dealing with the smell of stale gas. However, this job is only worth doing right. Bing will recondition your carbs for you, as will any number of dealers and independent mechanics.
Your dealer sells a rebuild kit for about $43 that includes new diaphragms but does not include the butterfly shaft screws. For most rebuilds, you can skip the diaphragms and buy the #1 kit directly from Bing for about ten dollars less after shipping, or buy the individual parts from the dealer for a similar price.
* Yes we know it is not actually a choke. "Enrichening circuit" is just too long. Get over it.

