K75RT fairing repair
|
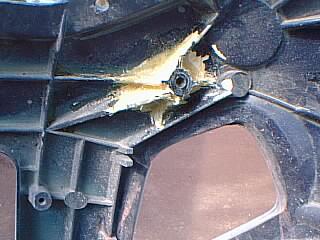
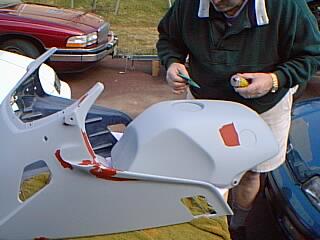
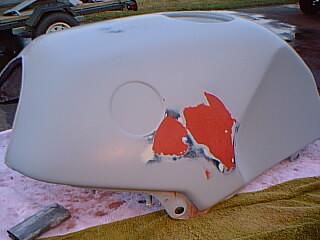
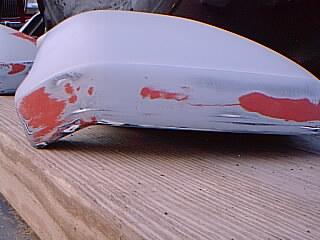
Note: Don't ask me to repair yours. This is just about my experience trying it. It's time-consuming and tedious. BackgroundFairings are very easily damaged in a crash and very expensive to replace. Most repair shops won't touch them. For a total of about 10 hours of work you can repair a fairing part, and with very little extra time you can repair several. We started with four upper fairings (of which we repaired two) . All of the uppers had a broken upper mount, which turned out to be only a small problem, especially if the broken-of part is still available. Also there were numerous small cracks and one or two breaks in each one. These parts are basically injection-molded glass-reinforced resin. They are not laid up on a mold out of individual strips. This means that you cannot sand down to find a stronger "base" to mend; the entire part is a homogeneous mix of fibers and resin. When there is a break, the fibers pull apart throughout the broken area, and they will not go back together. This is important! To get the parts back together properly (from a complete break) the edges must be cleaned of glass fibers. We ran a coping saw blade through the break on one fairing to ensure that we could get the spacing correct again. Breaks and cracksTo repair the breaks and cracks, we ground the surface of each one down about one millimeter and applied strips of glass cloth and resin to ment them. Definitely do this from the back, and do it from the front, too, if possible. If you don't repair a crack, there is a possibility that a crack will appear in the newly painted panel once it's in use. As long as it's repaired from one side, though, it will hold together. Mounting bossesFor one fairing, we had the mounting boss. We sanded the loose fibers off the mating edges and also ground away the paint on the surrounding flat areas and the ribs. We epoxied the boss back into position, and then reinforced the ribs with fiberglass. For the other fairing, we didn't have the boss, so we made one out of two nuts welded together, then suspended it in the correct position using the support tree. We built up a base of epoxy putty and embedded the nuts in it, resulting in a strong mounting point. We then reinforced that with fiberglass as well. Next time, we will buy a blind threaded bushing of the right size (like the ones used on the windshield edges) to eliminate thread misalignment and leakage into the threads. The original insert looks just like the windshield bushing, except it's made of brass. FinishingThe finishing details are similar to auto-body repair. We sanded the areas smooth, applied Bondo, sanded, and then finished the contouring with coats of Nitro-Stan, sanding between each coat. The primer, sand, fill, etc. until you have a satisfactory surface which is completely primed. In the picture at right, Bruce is applying the Nitro-Stan to the left side of the tank (where the fairing had dented it). The spot on the right side was dented by the rider's knee during the accident. Nitro-Stan isn't really the right thing to use for filling deep dents, but since the tank is aluminum, we didn't want to strip it to bare metal, as is required for most fillers. The repair on the left side, after sanding, is shown also. MirrorsWe filled the seams in the mirrors with Bondo and then sanded , primed, and applied Nitro-stan. The result is pretty decent, and it looks a lot better than the open seams which you see on stock mirrors. Sanding and painting is difficult with that seam there. On Mike Ormont's bike the seams were not filled, and filling them might be easier in general that dealing with the problems of painting them unfilled. PaintingWe painted all of the parts using Glasurit paint in a friend's paint booth. Three coats of color and two of clear - the results are pretty impressive. I stayed with the same Astral Blue (grew to like it!) and got the paint from Holt BMW. Believe me, EVERY blemish shows when you paint. If you haven't experienced this, learn now. Don't ever think that paint will hide a tiny scratch and you don't have to worry about it. In reality, paint will expose flaws in the bodywork that were not at all discernable beforehand. If a flaw is noticeable (in any way at all) beforehand, forget about hiding it. There was a bit of dust in the paint, since the paint booth was not fully enclosed, but a few minutes with some 1600-grit sandpaper should do wonders. Overall the quality of the paint is fantastic. The color match to the existing fenders is perfect to my eye. The mirrors look great, especially since we filled the seams. The blemishes from poor preparation (and there are a lot when you look really close) are not a problem to me and they aren't really obvious anyway. I shouldn't really say "poor preparation" since we did really good work, but the bottom line is that with a few more days of work, we could have gotten better results. I'm happy with the compromise we made because the bike's rideable now. Any further work would have delayed the project by two weeks. We finished painting at about 4:00 AM Saturday and left the parts in the booth until Sunday morning. The paint still wasn't really hard, but it was dry. We were pretty careful with the parts during assembly (separate post) and a day of exposure to fresh air seems to have hardened the finish up a lot more. Paint was thinned about 20% or 25% and we used about 2/3 of a pint to cover the upper, lowers, tank, side panels, mirrors, and radiator shroud. |
 Fiberglass and Nitrostan repair |